
Archive for the ‘what’s cooking wednesday’ Category
What’s Cooking Wednesday: Stuffed Peppers
 When I was younger, I missed out on a lot of amazing food simply because my tastebuds weren’t ready; I was always a good “tryer” though, so I was sure that I’d be ready whenever my tastebuds were.
Case in point: I tried sweet potatoes *every* year at Thanksgiving until I liked them. Now I love them!
I don’t remember exactly when I started actually liking (then loving) peppers, but I’m so happy my tastebuds finally caught up to the desire for the flavor.
Indeed, peppers continue to be one of my very favorite foods in the world, especially when included in my mom’s stuffed peppers, today’s What’s Cooking Wednesday recipe.
Note: this is *very* different from how P’s mom makes peperoni ripieni, which are quite similar to her Calabrian stuffed eggplant–meatless and fried.
To give you an idea of how local Italian cooking is:
P’s mom’s recipe is from Badolato; my mom’s recipe is essentially my great-grandmother’s, who came from Isca, the very next town over. I have also eaten stuffed peppers at another Iscatani household, and they tasted really similar to my mom’s–only they had a little surprise chunk of suppressata in the center. Try it!
So when you hear that Italian cooking is regional, think even smaller…it can differ *greatly* by town, just like the dialects!
The recipe below calls for sauce over the peppers as they bake; you can, of course, use your favorite jarred sauce or make your own by frying a clove of garlic (minced) and one small onion (chopped finely) in about two tablespoons of olive oil, adding a can of tomatoes/sauce, and adjusting for salt. It only needs to simmer for about 15 minutes as it’ll also cook in the oven.
If you’re planning on serving pasta with the peppers, use two cans/jars of tomatoes/sauce.
Stuffed Peppers

- 6 small peppers (see photos for size I used)
- 1 cup cooked rice (1/3 uncooked)
- 1 pound ground meat
- Fresh parsley, chopped
- 1/4 cup grated parmesan cheese (optional)
- Fresh basil, chopped (optional)
- Salt and pepper to taste
1. Cook rice and preheat oven to 375°F (190°C).
2. Wash peppers, cut off tops, and remove stem and seeds. If you’re using larger peppers, you can cut them in half and make double the amount of stuffed peppers by using both halves (just be sure to make more stuffing).
*Note: The parts of the pepper I didn’t use but that were still edible, I sliced up and used for potatoes, peppers, and eggs the next day.
3. Bring pot of water to a boil and drop peppers in, parboiling them for a few minutes. Remove from water, pat dry, and set aside to cool.
4. While peppers are parboiling, prepare stuffing by mixing together rice, meat, and parsley (cheese and/or basil) in a medium bowl.
5. Put some tomato sauce in a small baking dish so the bottom is lightly covered.
6. Sprinkle each pepper shell with salt and then stuff them with mixture and set in baking dish.
7. Cover peppers with rest of sauce and cover dish with foil.
8. Bake in oven for about 45 minutes to an hour or until the meat inside is cooked.
9. If you’ve made enough sauce you can serve pasta with the sauce and then the pepper as a second dish or simply serve the peppers by themselves with crusty Italian bread.

Buon appetito!
What’s Cooking Wednesday: Fried Mozzarella Sticks and Dipping Sauce
Today’s What’s Cooking Wednesday recipe is for those of you who think you have to go to a restaurant or buy the pre-packaged frozen version to enjoy fried mozzarella sticks. You don’t!
All you need is some good, fresh mozzarella and the usual items for breading, and you’re good to go.
What I made are actually disks not sticks, but that’s because our mozzarella comes in small balls, so I thought it would be easier just to work with it rather than try to make sticks.
You’re welcome to cut as you wish.
Fried Mozzarella Sticks

- Mozzarella
- Ingredients for breading listed in Breaded Veal Cutlets (see caveat below regarding measurements)
- Olive oil for frying
1. To prepare the mozzarella, cut it into sticks or disks; you can also buy pre-prepared sticks for this.
2. Dredge the mozzarella first in flour before dipping in egg and then the breadcrumb mixture. Unless you’re making a lot of mozzarella, you won’t need as much of the ingredients as listed in the cutlet recipe, so just play around with the measurements a bit until you get the right mix for your taste.
3. Fry breaded mozzarella in hot olive oil or vegetable oil if you like. Put enough oil in the pan so the sticks are about half-submerged. Let them fry for about 15 seconds on each side and then put them on paper towels to drain.
Fried Mozzarella Sticks Dipping Sauce

- 1 tablespoon olive oil
- 1 clove garlic, cut into a few pieces
- Small can of tomato sauce or canned tomatoes run through grinder
- 1/4 cup of water
- Oregano
- Salt and sugar to taste
1. Heat olive oil in small pan and then add garlic and saute for a minute or two, but don’t let it brown.
2. Add tomato sauce and water.
3. Add oregano, salt, and a pinch of sugar if you like, which can cut the acidity of the tomatoes.
4. Let simmer for about 15 minutes, stirring occasionally.
5. Serve hot alongside fried mozzarella sticks.
Buon appetito!
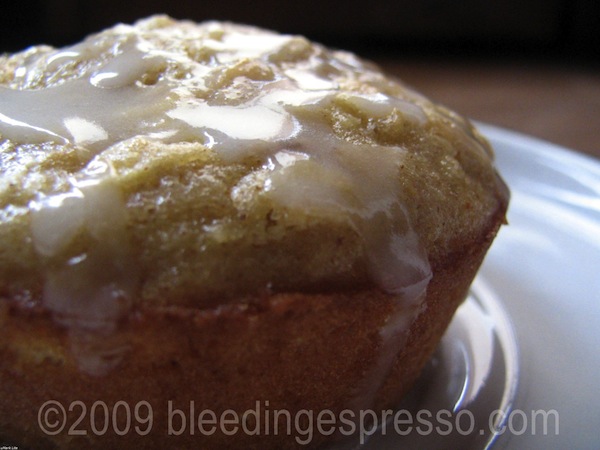
What’s Cooking Wednesday: Glazed Apple Oatmeal Cinnamon Muffins
 One of the American magazines my mom so generally sends me from time to time is All You. Have you heard of it?
I *love* this magazine. The writing is casual and comfortable, and it includes many ideas that I’m actually likely to use–not just things that although I find interesting would never attempt.
One of those fabulous ideas was an easy recipe for Apple-Cinnamon Cupcakes in the December 26, 2008 issue, and this week’s What’s Cooking Wednesday recipe is my adaptation.
Aside from making delicious muffins, this recipe doesn’t make very much–so it’s great for those of us who will have to eat most if not all of the muffins ourselves.
I added oatmeal to make them a bit more muffiny as opposed to cupcakey and also to add more nutritional value, although as they were, these were actually respectable as far as sweets go (nutritional information is listed in article on page 114). These came out extremely moist and quite dense–just the way I love baked apple cakes, er, muffins.
Plus I figure with the oatmeal, these are now totally OK for breakfast, right?
Glazed Apple Oatmeal Cinnamon Muffins
(makes 5-6 muffins)

For muffins:
- 3/4 cup flour
- 1/2 cup sugar
- 3/4 teaspoon baking powder
- 3/4 teaspoon cinnamon
- Pinch of salt
- 1 egg
- 1/2 cup milk
- 1/4 cup vegetable oil
- 1/2 teaspoon vanilla extract
- 1 large Granny Smith or other tart apple
- Juice of half a small lemon
- 1/2 cup oatmeal
For icing:
- 1/3 cup confectioner’s sugar
- 1 tablespoon lemon juice
1. Preheat oven to 375°F.
2. In a large bowl, mix together dry ingredients for muffins.
3. In a small bowl, whisk together egg, milk, oil, and vanilla, and stir into dry ingredients until just combined.
4. Peel and grate apple into fine mesh sieve over the sink, being careful to stop before hitting the core. Squeeze in lemon juice and mix to distribute among apple.
5. Stir apple and oatmeal into muffin mixture.
6. Grease muffin pan and fill muffin cups 2/3 full. Bake until golden and toothpick inserted in center comes out clean (about 20 minutes).
7. Let muffins cool for five minutes then remove and place on wire rack.
8. Meanwhile, in a small bowl, whisk together confectioner’s sugar and lemon juice, and then drizzle over muffins.

Buon appetito!
P.S. Remember today is Pesce d’Aprile in Italy!
For more fun, check out April Fool’s Backfires!
What’s Cooking Wednesday: Calabrian Scrambled Eggs
This week’s What’s Cooking Wednesday is an old *and* new family favorite. My grandmother used to make it all the time, and now P and I make it quite often as well.
Calabrian Scrambled Eggs are definitely one of my all-time fast and filling dishes–and it can also be great for using up leftovers. This is a fab dish for singletons as well as you can easily make just enough for one person.
Now you may be asking yourself: Self, what exactly makes these scrambled eggs Calabrian?
It’s the supressata*, silly:

You can, of course, substitute with any kind of meat you like from sausage to ham to mortadella (bologna), and it will be just as tasty. Only a bit less Calabrian is all.
And in case you don’t already, I hope you think of scrambled eggs in the same way as you would an omelet…anything goes. That is, if you like it and think it will go nicely with eggs, have at it!
Calabrian Scrambled Eggs
Uova strapazzate alla Calabrese
(serves two)

- Two tablespoons olive oil
- One small onion, sliced
- About a handful of cubed supressata (probably about 100 g)
- 4 eggs
- Splash of milk
- Two pinches of salt
- One slice of meltable cheese (Sottilette in Italy)
1. Heat oil over medium in a nonstick pan and add onion and supressata. Let them fry for a few minutes until the onions soften and the meat starts to release its juices.
2. In the meantime, break eggs into a bowl, add milk and salt, and beat together well.
3. Pour egg mixture into pan and add cheese in small pieces.
4. Move eggs around as they cook to get that patented scrambled look; they’re ready when they’ve set and are no longer runny.
5. Serve hot, and if you’re like us, with crusty Italian bread and a nice tomato salad. Yum!
Buon appetito!
*Alternatively known as sopressata, soppressata, suppressata, and “soupies” back in the Anthracite Coal Region.
What’s Cooking Wednesday: Homemade Chicken and Rice Soup
Are you someone who would never think of making your own chicken stock because it sounds way too Martha Stewarty, i.e., complicated?
Well this week’s What’s Cooking Wednesday is for you.
Making your own chicken stock is easy peasy, plus you’ll feel like a star chef when you’re done…and then you’ll wonder why it took you so long to brave the task of making chicken stock. Seriously. *So* easy and delicious!
In the recipe below, I’ve listed that you need a chicken, but you actually don’t. All you really need are the remains of a chicken with just a little bit of meat left on it, skins, whatever you’d normally discard from a chicken. If you’ve picked clean a rotisserie chicken, use that! It makes fabulous, already well-seasonsed stock.
Aside from the chicken, for great soup, I recommend *always* putting in onion and celery (whole or chopped, up to you), and then, well, whatever else you like and/or have available. This particular go-around, I added carrots and chard because that’s what I had in my fridge, but you can add corn, peas, spinach, escarole, whatever you like.
Now yes, making homemade soup does take a bit of time, but it’s not like you have to stand over the pot the entire time. Especially if the weather is still chilly where you are, may I recommend:
Homemade Chicken and Rice Soup
(about 6 bowls of soup)

- 1 small chicken
- Cold water to cover the chicken
- 1/2 lb. chard, chopped coarsely
- 2 stalks celery, chopped or left whole
- 3 onions, left whole
- 2 carrots, sliced
- Salt to taste
- Ground black pepper to taste
- 1/4 cup rice per person
- Grated parmesan cheese (optional)
1. Put chicken in a large stock pot and cover it with cold water. Cook on medium to high heat for about an hour and a half, periodically skimming off foam that surfaces.
2. Cook chard in salted, boiling water until it’s soft.
3. Once the chicken is cooked, remove it from the water and let cool, and remove any remaining foam.
4. Add the celery, onions, carrots, salt, and pepper to the broth, and let cook for another half hour or until you start to see that the onions are getting mushy. Take out the biggest chunks, but if you like, take some of the mushiest and chop them very finely to throw back in.
5. In the meantime, clean off the chicken and put the meat back into pot, discarding bones and skin.
6. Add chard to broth.
7. Cook rice either in broth or separately.
8. Serve with grated cheese if you like (I do).
Buon appetito!
Now, for broth beginners, are you going to try this or what? And for you experts, do you have any chicken stock tips to share?
 Michelle Kaminsky is an American attorney-turned-freelance writer who lived in her family's ancestral village in Calabria, Italy for 15 years. This blog is now archived.
Calabria Guidebook
Recipes


