
Archive for the ‘food’ Category
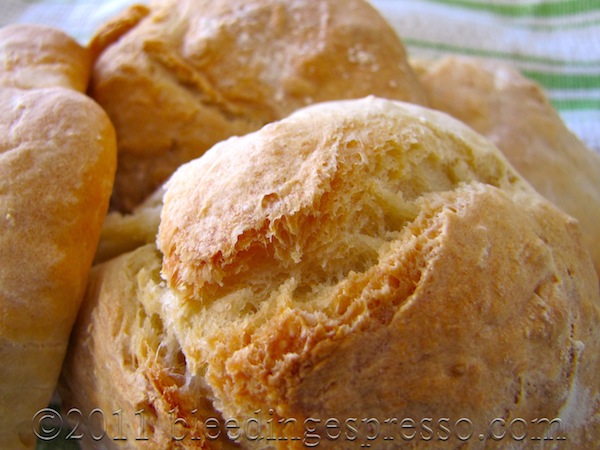
No-Knead Bread Rolls – No Dutch Oven Necessary

Success at last! No-knead bread.
The no-knead bread phenomenon has been sweeping the Interwebs for several years now thanks to Mark Bittman, but I haven’t waded into the fun until now. For whatever reason, working with dough intimidates me, so I tend to stay away from it, but all the rave reviews of this no-knead bread had me curious. So I had to try it, which I did in September.
Um, yeah, that didn’t help my Dough Confidence Quotient whatsoever. It was an absolute and utter disaster.
They say this dough should be really sticky; mine was nearly runny after the first rise. There could have been yeast/rising issues, but I think the biggest problem was lack of flour. But everyone says, “Don’t touch the flour! You’ll ruin the delicate balance of ingredients! The measurements must be *exact*!” So I ditched the batch, hung my head in shame, and wallowed in self-pane pity.
Then in November, I visited Diana in Piemonte, and she made an absolutely perfect no-knead loaf . . . and my Bread Envy was off the charts.
So about a month ago, I picked up the flour again, probably feeling confident after making a mean batch of cinnamon rolls around Christmas time (recipe coming). I figured hey, if the dough doesn’t feel right to me (with all my Faux-Dough Authority), I’m adding flour. I don’t care what they say. Who are “they” anyway?
So extremely happy I did. I LOVE this bread, and you will too if you haven’t made it yet, I promise.
It forms a wonderful crisp crust on the outside but is chewy and light on the inside. Simple and perfect — and the best part is, it’s easy as all get out (once you figure out whether you need to make adjustments for your humidity/altitude).

No-knead bread rolls
I do believe the ridiculously high winter humidity here simply requires the use of a bit more flour in this recipe. I’ll probably be OK with the given proportions come summer when the air is dry, but hey, we’ll cross that wheat field when we come to it.
The reason I’m posting this recipe even though you can find it absolutely everywhere, though, is because of some inspiration from the Panini Girl, who as you might have guessed from her name, decided to make little two-bite sized rolls out of this dough. I decided to give it a go by making six full-sized rolls, and they came out wonderfully — even P grabbed one while it was still warm, and he is very picky about the pane he consumes (paesano only!).
The best part about making the rolls? You don’t need a dutch oven or similar vessel for baking — just grease up a cookie sheet. Thanks so much Panini Girl for showing me the way to these no-knead bread rolls!
No-Knead Bread Rolls
(Adapted slightly from the famed recipe published in The New York Times by Jim Lahey, Sullivan Street Bakery)

No-knead bread rolls
- 3 cups all-purpose or bread flour (note you can play with the types of flour but make sure you know the proper substitution ratios)
- 1 1/4 teaspoons salt
- 1/4 teaspoon instant yeast
- 1 1/2 cups lukewarm water
1. Stir together flour, salt, and yeast in a medium mixing bowl, then add water. Mix together until you have a “shaggy and sticky” dough. I use a silicon spatula for this part after trying both a wooden spoon and hands. The spatula works wonderfully because you can also use it to scrape down bits that have climbed the sides of the bowl.
2. Cover the bowl with plastic wrap and let it sit for 12 to 24 hours; 18 hours is the recommended time. Seeing that it’s winter, I put mine in the unheated oven as it’s warmer in there and the most safe from drafts — we don’t have heat in the kitchen, so it’s nowhere near the ideal 78°F (25°C) for dough-rising. Generally people seem to agree that it’s great to whip this dough up in the afternoon or evening, let it sit overnight, and then bake the bread the next morning. Works for me, too.
3. The dough is ready “when its surface is dotted with bubbles.” Dust a wooden board or other work surface with flour, and put dough on it. I do recommend watching the video below so you can see what’s a normal dough consistency at this stage. Add a little more flour and fold the dough over on itself once or twice so that you’ve created a “seam” on top.
4. Put a large cotton towel nearby and dust it with flour (or cornmeal, wheat bran). Put dough on the floured spot in the towel, seam-side down. Dust again with flour before folding up the sides of the towel to cover it. The dough should now sit for another two hours or so before it’ll be ready to go in the oven.
5. Half an hour before you’ll be baking, preheat the oven to 450°F (230°C) and grease a cookie sheet with olive oil.
6. The dough is ready when it has doubled in size and no longer springs back from your touch. Divide the dough into six pieces, roughly shaped into balls and arrange them on the cookie sheet leaving at least an inch between them. They may bake together a bit, but they’re easily separated anyway so long as they’re not touching too much.
7. Place sheet in the oven and bake for about 35 to 45 minutes, until rolls are golden brown.
Buon appetito!
I’m also sharing this video for you visual folks; this helped me greatly in understanding the steps:
Have you made no-knead bread? What did you think?
How to Brew Coffee in a Stovetop Moka Pot

Coffee brewing in a stovetop moka pot
Happy National Espresso Day! While the “National” refers to the US (apparently Italy celebrates espresso in April), I say we make it International Espresso Day — and I’m going to help you celebrate by finally doing the post I know some of you have been waiting to see at Bleeding Espresso:
How to Brew Coffee in a Stovetop Moka Pot
First things first. The word “espresso” refers to the way coffee is brewed not to the coffee itself. Espresso is brewed by water that is forced up threw finely ground coffee because of steam pressure; in America especially, “coffee” is generally made in a percolator or via the drip method. The latter actually ends up having a higher concentration of caffeine, while the former tends to be thicker and richer in flavor.
Put another way, espresso is always coffee, but coffee is not always espresso. That said, it is important that if you want to make espresso in a moka pot, you get finely ground (often called “espresso grind”) coffee as other types are too coarse.
Some people might argue that coffee made in a stovetop moka isn’t *really* espresso since it doesn’t tend to create the gorgeous layer of golden brown “crema” on top, but really since it is indeed brewed via pressure coming up from the bottom, it is.

- Parts of a stovetop moka pot
It’s not going to taste exactly like what you get in a bar (remember in Italy, the place where you get coffee is called the “bar”), but quite simply, for many of us in Italy and elsewhere, making this type of coffee at home is just the most cost effective choice — we also find it quite delicious as well.
Where did the moka pot come from?
The moka pot was created by Bialetti and rose to popularity in Italy in the 1930s; the basic design has been copied ever since, and there are also different moka pot looks, so feel free to experiment. Moka pots also come in different cup sizes (ahem), so it’s not uncommon to see several different sizes of moka pots in an Italian house for use with different numbers of guests.
Now, finally, the easy peasy directions for how to brew coffee in a stovetop moka pot:
1. Fill the bottom with fresh, cold water up to the middle of the safety valve; as you can see in this photo, my moka has a line that marks that level in various places around the bottom, which makes it even easier to tell where to fill to.

Bottom of moka pot filled with water.
2. Put the basket in the bottom, and spoon in the coffee. This part you can experiment with, depending on how strong you like your coffee. As you can see, we like ours pretty strong, but you can fill yours considerably less — the most important thing to remember is not to pack it down.

Basket really full of coffee.
3. Screw the top onto the bottom creating a super-tight seal. I use a towel for extra traction to really get that last turn tight. Then put the pot on the stove on low heat.

Moka pot on low heat.
4. The top part of the moka will begin to fill with coffee. When you start to hear the sputter and gurgle of the coffee, remove it from the heat. P.S. Don’t lift the lid as I did for the sake of photos. There is very hot coffee spurting out of there, and it doesn’t care what’s in its way.

Coffee just about ready.
5. Serve hot, with or without sugar, with or without steamed milk, just however you like it.

Steaming cup of espresso made in a stovetop moka pot.
When cleaning the moka, I have been told to never use any kind of detergent on it at all, so I don’t (just hot water and my hands). I have seen recommendations online to use a mild detergent, but I’m going to stick with what the locals here tell me. I do, however, take a scouring pad to my moka pot now and again to keep it looking mildly shiny, but as you can see from the photos, mine isn’t exactly new.
Ah, and that’s another thing about using a moka pot — throw out at least the first batch of coffee made by it, possibly even two or three batches. The flavor is just going to keep getting better the more you use it, so if your pot starts experiencing problems (the coffee is leaking out the sides at the seal or the top part isn’t filling up with coffee), I’d say to change the rubber ring that creates the seal. The replacement ring costs 15 cents (here at least), and it’s well worth a try before you start over with a new moka pot IMHO.
How do you drink your espresso?
Escarole, Bean, and Pancetta Soup – Zuppa di Scarola, Fagioli e Pancetta
Last week Vince at Scordo posted a recipe for Escarole and Bean Soup. It looked tasty to me, and just as I was tucking it away in my memory, wouldn’t you know my mother-in-law gave us a bunch of escarole the next day?
I more or less stuck to Vince’s basic recipe but added some pancetta — and then P wanted some soup pasta with it so we threw that in as well (although that’s not in the photo below).
This recipe is super easy and delicious, especially if you use canned beans. As Vince mentions, your own soaked beans inevitably taste better and are less expensive, though, so give them a try sometime as well.
Overall, I have to say, if you’re looking for a hearty, warm-your-soul kind of meal, this is a wonderful choice.
Escarole, Bean, and Pancetta Soup — Zuppa di Scarola, Fagioli e Pancetta

Just grab a spoon and a hunk of bread!
- 3 tablespoons of olive oil
- 2 cloves of garlic, each cut in half
- 1 peperoncino, cut into a few pieces
- 40 g of pancetta, cubed
- Bunch of escarole, washed and coarsely chopped
- 2 cans of cannellini beans
- 1 liter of water
- Salt to taste
1. Heat olive oil on medium heat in a large soup pot and sautée garlic, peperoncino, and pancetta for a few minutes.
2. Add escarole and sautée until wilted, being sure to coat thoroughly with the oil mixture. Add a bit of salt as well.
3. Add water, beans, and a bit more salt. Cover, turn down heat to low, and let simmer until the escarole is done to your liking — at least 10 to 15 minutes.
4. Serve hot with fresh chunky bread; although it’s not very Italian of me, a slab of butter on the bread and then dipped in the soup just makes everything right with the world.
Buon appetito!
Love Thursday: An Adorable Little Nuccihra of Love
P and I don’t have grand birthday or Christmas celebrations; neither of us are fans of giving gifts only because it’s expected, although “just because” or “I was thinking of you” tokens are always welcome around here.
And we do tend to exchange little, thoughtful things year round — often simple gestures like one of us taking over cooking duties or running to the store when the other is exhausted. There are some physical gifts, but they tend to be of very little monetary value. In our house, it truly is the thought that counts — it always warms my heart to know that when P was “in giro” (out and about), he saw something and thought of me.
Over the years, he’s brought home tiny rosebuds, almond blossoms, old lire coins, a big bluish green lizard (!), porcini mushrooms, and even some saffron flowers.
And most recently this little nuccihra (noo-CHEE-ruh) arrived:

An adorable little nuccihra of love
It’s a type of hazelnut (nocciola) here in the mountains of Calabria —“nuccihra” is Badolatese (local dialect) for little hazelnut . . . an adorable little nuccihra of love if you ask me.
Happy Love Thursday!
My Calabria by Rosetta Costantino

My Calabria on Amazon
Rosetta Costantino was born in Calabria and moved to America with her family at age 14. Although they left behind much of what was familiar to them, the Costantino family never lost their culinary traditions — and now Rosetta shares them with us in My Calabria: Rustic Family Cooking from Italy’s Undiscovered South.
When paging through My Calabria, you feel like an honorary member of the family at the table as you learn about how Rosetta’s father recreated their Calabrian garden in Oakland, California; how various members of the family make the same dish; and also the 11 ingredients every Calabrian pantry should have on hand.
Rosetta also shares information about the historical and cultural influences on Calabrian cuisine and lifestyle, so aside from being a wonderful collection of recipes (150) that includes appetizers through dessert, My Calabria is simply a wonderful resource book on the region — you’re getting so much more than a cookbook here.
The recipes themselves are authentic as they come and easy to follow — one of the best things about Calabrian cooking is that it’s user-friendly as it uses so few ingredients — and the book is just gorgeous. There are plenty of full-page and other sized color photos throughout, not only of recipes but also of various sights from around Calabria.
From a personal standpoint as someone who has been making Calabrian food ever since I could cook — first from my grandmother’s recipes and now also from P’s mom’s — I give this book five very full espresso cups out of five. Rosetta is a wonderful tour guide through this region’s food, history, and culture, and I highly recommend My Calabria for anyone who is interested in Calabria, southern Italy, or southern Italian cuisine.
*
You can find out more about Rosetta, her book, and her culinary tours at Cooking with Rosetta and her blog, Calabria from Scratch. You can also listen to Rosetta’s interview in the Eye on Italy podcast, which I co-host.
*

Subscribe to my Book Reviews feed — book reviews ONLY, which aren’t published to the main feed — by visiting Feedburner.
 Michelle Kaminsky is an American attorney-turned-freelance writer who lived in her family's ancestral village in Calabria, Italy for 15 years. This blog is now archived.
Calabria Guidebook
Recipes


