
Archive for the ‘what’s cooking wednesday’ Category
what’s cooking wednesday: roasted peppers with garlic & olive oil
 Just those words have your mouth watering, don’t they?
Well not if you don’t like peppers, but if you’re like me and could eat any kind of pepper–sweet, hot, red, yellow, green–at just about any given time, you probably love roasted peppers as well.
And there’s no reason why you can’t have them made at home whenever you want (provided that you can get peppers). My favorite are roasted red peppers because they’re oh-so-sweet, but you can use any kind you like.
There are a few different ways to prepare them, but to me, grilling them is best. We do ours over smoldering coals:
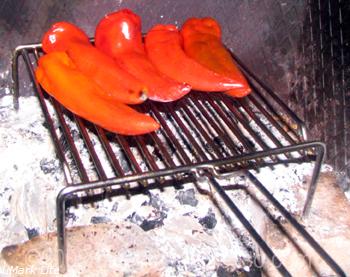
But if you use your broiler, the peppers are still going to be delicious. Check out this great tutorial from AllRecipes.com on how to roast peppers in the oven.
Yes these get a little messy (I’m spoiled in that P actually enjoys all the dirty work here), but they are so worth the effort–you’ll never buy pre-prepared roasted peppers again after you taste them homemade.
Perhaps some of you are already wondering what to do with roasted peppers. A simple Google search led me to this page from Prevention’s The Healthy Cook: The Ultimate Illustrated Kitchen Guide to Great Low-Fat Food.
Some of The Healthy Cook‘s suggestions are pepper and cheese canapés, pepper fritters, peppers and shrimp salad, antipasto, and peppers parmigiana. They all sound fabulous, as does this book in general now that I’m looking at it more closely. . . .
Some more ideas? Add them to sandwiches, salads, dips (great in hummus!), tomato sauce, or as a topping on pizza.
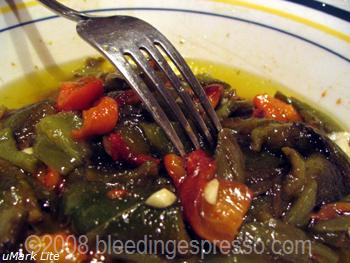
This is what we usually do with our roasted peppers: we like to dress them up with olive oil, garlic, and a touch of salt and then eat them with fresh, warm bread–even on toasted bread for a nice bruschetta with peppers.
Remember how great that bruschetta with tomatoes was? This is a great winter variation.
So without further ado, this week’s What’s Cooking Wednesday:
Roasted Peppers with Garlic & Olive Oil
- Peppers–as many as you like, of the variety you prefer
- Enough good olive oil to cover them
- Clove of garlic, chopped (depends on your taste how much you want to add–do experiment!)
- Salt to taste
Wash and dry the peppers and then place them on the grill whole and intact.
In preparing the peppers, the most important thing to remember is to turn them so that all sides are blackened. Trust me, you want the sides BLACK as this makes peeling them a lot easier.
Here are the remnants of our last batch (with an unroasted pepper):
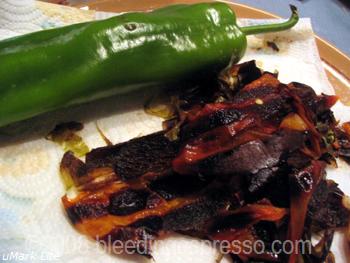
Once you take them off the grill and have given them a chance to cool off a bit, pull out the stems. Now peel the skin. P uses a small knife, but he uses a knife for everything (he *is* a southern Italian man). You can also do this with your bare hands of course.
Be sure to remove all the seeds, which you can do by squeezing the pepper from top to bottom between your index finger and thumb.
If there are any of the membranes left inside, scrape those out too.
Now you’re ready to do whatever you like with them. For the preparation shown above, slice and place in bowl and then cover with olive oil. Add as much chopped garlic and salt as you like and let them marinate at least an hour before eating.
I know it’s hard to wait, but you’ll thank yourself later.
Buon appetito!
**If you haven’t yet, remember to check out my welcome post and find out about how you can win a $30 Amazon.com gift certificate!**
—————
[tags]roasted peppers, roasted red peppers, peppers, cooking, what’s cooking wednesday[/tags]
What’s Cooking Wednesday: Bagels
 I wasn’t going to post a recipe today since I honestly haven’t been cooking very much lately–we had Christmas dinner at P’s parents and we spent New Year’s Eve at a friend’s house. Indeed, it’s the same place we spent New Year’s Eve last year, so if you’d like to see some photos from 2006, you can check them out here.
More on the recent New Year’s Eve soon, but for now–bagels!
Michelle of Michellanea posted this bagel recipe a while ago for those of us in Italy dying for something, anything that we can smear some cream cheese on, and this recipe definitely delivers.
In my baking frenzy around Christmas, I finally decided to give these a go, and I will definitely be making bagels more frequently around here from now on. The recipe is easy to follow and carry out; the only time-consuming part is waiting for the dough to rise. And then waiting for them to cool off before you dig in.
The measurements are for those of us using metric, but everything is easily convertible these days online, for example at JoyofBaking.com.
Bagels
(makes 8 large bagels)

30 grams fresh yeast
2 tablespoons of oil
3 teaspoons of salt
2 teaspoons of sugar
1 teaspoon honey
500 grams of flour
Dissolve yeast in 250 ml of warm water and add oil. In large bowl, mix together salt, sugar, and flour. Make a well in the center and add in yeast mixture.
Mix together all ingredients, working in flour on the sides of the bowl in order to get an even mixture. Work dough into a ball.
Cover bowl with a damp towel for about 40 minutes and let dough rise in a warm place; it should double in size. Put a piece of wax paper on the baking sheet you’ll be using for the bagels.
Work the dough for about ten minutes. Divide into 8 little balls. Make a hole in the center of each ball and widen the opening until it begins to take the shape of a bagel.
Let the bagels sit on the warm towel for another 15 minutes while you heat the oven up to 200°C.
In the meantime, bring a large pan of water to a light boil (adding the 1 teaspoon of honey, which is a substitute for malt). Let each bagel boil lightly for about two minutes on each side and then remove and put them back on the damp towel.
If you are adding sesame or poppy seeds, at this point, sprinkle them on a plate and press each bagel down lightly over them.
After about five minutes, put the bagels on the wax paper-covered baking sheet and place in oven for about 20 or 25 minutes until they are golden brown (but not too brown – they will get a bit browner after they’ve cooled), flipping them after about 10 minutes to ensure even baking.
Buon appetito and thanks again to Michelle for the great recipe!
What’s Cooking Wednesday: Thumbprint Cookies
Or, “12 Christmas Memories: Part III. ” If you haven’t yet, do check out Part I and II.
6. Cookies!
I simply couldn’t do a series on my Christmas memories without cookies.
My grandmother always made cookies for the holidays, but my mom? She goes crazy. In addition to making them for the family, she’s now started selling trays of homemade cookies and candy–and she’s doing so well that I just may have to go to America to help her next year. Go Mom!
And so, making cookies is definitely one of my fondest Christmas memories. From the time I could walk, I was around the kitchen helping make cookies–although for a while there I didn’t do much other than steal chocolate chips off the table, earning me the nickname “Cookie Monster” from my mom’s friend, her baking partner for many years.
But eventually I worked my way up to working with sprinkles and candied cherries. You know, the Big Time.
My mom made it fun not only for me but also for the friends I was allowed to invite over to help decorate the cut-out cookies–there were far too many stockings and Santas and snowmen and bells and wreaths for just one or two people to decorate.
So at my mom’s house, we’d have decorating slumber parties every year between Thanksgiving and Christmas. Just the other day, in fact, one of my best friends and regular participants in the bake-a-thons left a comment here on the blog longing for the days of such innocent fun.
And I’m so with her on that.
 (I’m the one without a blurred face; maybe 12-13 years old here? Not sure.)
And yes, in case you’re wondering, my niece is fully prepared to keep this tradition going. Just the other day my mom said that she’s getting to the age where she can have some friends over to help decorate (she already helps my mom with the cut-outs).
So next year, 9-year-olds at Nana’s!
Before this year, I have never done the Christmas cookie thing by myself–why would I when my mom had it covered? But now that I’ve been here for a few years and have really missed those tastes of home, I decided that this year I’d make some of my mom’s recipes and give out trays to Italian family, friends, and neighbors.
I highly doubt any of them have ever even seen the cookies I made, so it’ll be an interesting experience for all of us.
Yesterday I finished up the last of six types that I made this year, and I’ve already decided that next year I’ll try my hand at even more. My mom had sent me some things like chocolate chips and brown sugar, but since I decided on Operazione Biscotti at the last minute, some cookies just weren’t going to happen this year for lack of the proper ingredients and tools.
But look out Christmas 2008!
 I’m not going to share all the recipes with you now, or even the photos just yet, but I will let you in on what has to be one of the easiest and tastiest cookies ever for this week’s What’s Cooking Wednesday. In fact, this is a great one to make with kids because they get to play around in the dough as much as they want and they really can’t ruin it.
“Unless their hands are dirty,” adds my mom.The words of wisdom never end I tell you.

These classics will also be my entry in Food Blogga‘s Eat Christmas Cookies event. Go check out all the great cookies over there–just beware you’ll probably leave hungry.
Thumbprint Cookies*
 2 c flour
3/4 c confectioner’s sugar
1 c butter
1 tsp vanilla
Jelly of your choice (I used apricot and strawberry)
1. Combine flour and sugar and then cut in butter until well distributed. Sprinkle with vanilla and mix dough with hands until smooth.
2. Shape into 1 inch balls and place about 1 inch apart on greased cookie sheet.
3. Indent centers with lightly floured finger (or thumb!) and fill with jelly.
4. Bake in preheated 325°F (163°C) oven for 15 minutes or until golden brown.
5. Remove to rack to cool.
Easy peasy and tasty too!
*I should note that the original recipe calls for a cup of chopped nuts–I just don’t like them in this, so I don’t put them in. If you want to, put 1/2 of them in with the flour and sugar in the beginning, and then, after you make the dough into balls, roll them in the remaining nuts. Thanks Christina for reminding me to include this!
Buon appetito!
Recipe: Tortellini con Prosciutto e Panna
 It’s holiday time. You’re in a rush. I’m in a rush. I’ll keep this short.
For this week’s What’s Cooking Wednesday, you need three ingredients–prosciutto cotto (cooked ham), panna (heavy cream), and tortellini, preferably stuffed with prosciutto crudo. OK, you need salt and water too, but that’s it.

Interested? (The clementines in the background are dessert!)
I’ve seen other versions of this recipe that add butter, cheese, and even an egg yolk, but honestly this is delicious just like this, although, as always, I do encourage you to experiment.
Feel especially free to add other ingredients to spice it up–peas or mushrooms are our favorite. You can also play with the type of pasta from fettuccine to pennette. It’s all good.
Tortellini con Prosciutto e Panna
(serves 3-4)
 250 g tortellini (half of the bag shown above)
150 g (between 1/4 and 1/2 lb) prosciutto cotto/cooked ham, torn up in pieces
400 ml panna/heavy cream (about a cup and a half)
1. Prepare tortellini in salted, boiling water.
2. Meanwhile, heat cream in large saucepan over medium heat until it starts to bubble. Stir in prosciutto and lower heat, being sure that cream isn’t sticking to pan. I use a heat-resistant rubber spatula during this part. Keep the cream and prosciutto mixture warm until the tortellini are ready.
3. When the tortellini are cooked to your satisfaction, drain them, and combine well with cream and prosciutto.
That’s it!
Buon appetito!

Sweet Apple Omelet from Gina DePalma’s Dolce Italiano
Meet Gina DePalma’s Sweet Apple Omelet, or as I like to call it, How to Eat Apple Pie for Breakfast Without Feeling Guilty.
Read on... Michelle Kaminsky is an American attorney-turned-freelance writer who lived in her family's ancestral village in Calabria, Italy for 15 years. This blog is now archived.
Calabria Guidebook

Recipes


